Specifications
|
Technical |
|
HDMI Compliance |
HDMI 1.4 |
|
HDCP Compliance |
HDCP 2.2 |
|
Video Bandwidth |
10.2 Gbps |
|
Video Resolutions |
up to 4K2K@24/30Hz |
|
Color Space |
RGB 4:4:4, YCbCr 4:4:4, YCbCr 4:2:2 |
|
Color Depth |
8-bit |
HDMI Audio Formats
(Pass-through) |
LPCM 2/5.1/7.1CH, Dolby Digital, DTS 5.1, Dolby Digital+, Dolby TrueHD, DTS-HD Master Audio, Dolby Atmos, DTS:X |
|
ESD Protection |
Human body model — ±8kV (air-gap discharge) & ±4kV (contact discharge) |
|
Connections |
|
Transmitter |
Inputs: 1x HDMI Type A [19-pin female]
Outputs: 1x RJ45, 2x3.5mm mini jack |
|
Receiver |
Inputs: 1x RJ45, 2x3.5mm mini jack
Outputs: 1x HDMI Type A [19-pin female] |
|
Mechanical |
|
Housing |
Metal |
|
Color |
Black |
|
Dimensions |
TX: 88mm [W] x61mm [D] x17mm [H]
RX: 88mm [W] x61mm [D] x17mm [H] |
|
Weight |
TX: 144g RX: 144g |
|
Power Supply |
DC 12V/1A Adaptor (US/EU standards, CE/FCC/UL certified) |
|
Power Consumption |
TX: 1.0W
RX: 1.5W |
|
Operation Temperature |
32 - 104°F / 0 - 40°C |
|
Storage temperature |
-4 - 140°F / -20 - 60°C |
|
Relative Humidity |
20 - 90% RH (no condensation) |
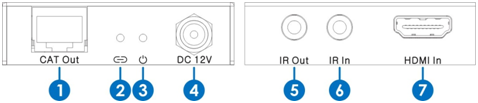
Transmitter Panel
1.
CAT: Connect the CAT output of the transmitter with the CAT input of the receiver with CAT6 cable.
2.Link LED: This LED will illuminate when the device is connected to HDMI source.
3.Power LED: This LED will illuminate when the device is connected with power supply.
4.
DC 12V: Connect from 12V DC power supply into the unit and connect the adaptor to an AC outlet.
5.
IR out: Connect the IR Blaster cable included in the package for IR signal transmission. Pace the IR blaster in direct line-of-sight of the equipment to be controlled.
6.
IR in: Connect to the IR Receiver for IR signal reception. Ensure that remote being used is within the direct line-of-sight of the IR receiver.
7.
HDMI in: This slot is where you connect the HDMI output port of your source equipment such as DVD/Blu-ray players or Set-Top-Box with an HDMI cable.
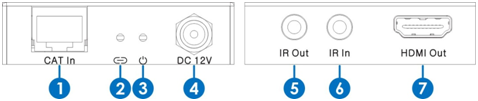
Reciver Panel
1.
CAT: Connect the CAT input of the receiver with the CAT output of the transmitter with CAT5E/6 cable.
2.Lock LED: This LED will illuminate when the HDMI signal from the transmitter is stable.
3.
Power LED: This LED will illuminate when the device is connected with power supply.
4.
DC 12V: Connect from 12V DC power supply into the unit and connect the adaptor to an AC outlet.
5.
IR out: Connect the IR Blaster cable included in the package for IR signal transmission. Pace the IR blaster in direct line-of-sight of the equipment to be controlled.
6.IR in: Connect to the IR Receiver for IR signal reception. Ensure that remote being used is within the direct line-of-sight of the IR receiver.
7.
HDMI out: This slot is to connect the HDMI input port of your display such as an HDTV.
Connection Diagram
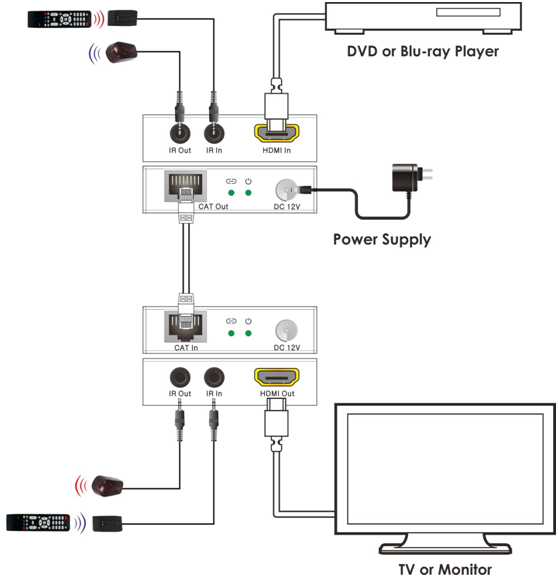
Connect and Operate
1. Connect a source such as a Blu-Ray Player, game console, A/V Receiver, Cable or Satellite Receiver, etc. to the HDMI input on the Transmitting unit.
2. Connect a display such as an HDTV or HD Projector to the HDMI output on the Receiving unit.
3. Connect a single Category6 up to 164ft/50m to the output of the Transmitting unit, and the other end to the input of the Receiving unit.
4. For power, plug both the Transmitting unit and Receiving unit with the included power supplies.
5. Power on each device in the same sequence (receiver and transmitter will already be powered when either unit is plugged in.)
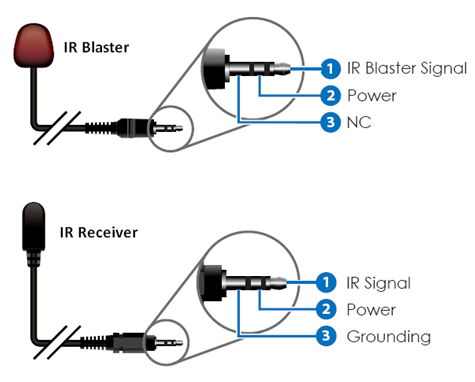
Wideband IR(30KHz---60KHz) introduction
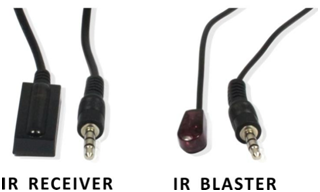 IR BLASTER (TX)
To control the source:
IR BLASTER (TX)
To control the source: Plug IR Blaster into IR TX port of transmitter unit; place blaster in front of the IR eye of the source.
To control the display: Plug IR Blaster into IR TX port of receiver unit; place blaster in front of the IR eye of the display.
IR RECEIVER (RX)
To control the source: Plug IR Receiver into IR RX port of receiver unit; place receiver at or near display.
To control the display: Plug IR Receiver into IR RX port of transmitter unit; place receiver in position where it is able to receive remote signals.