Operation controls and Functions:
Front Panel
 ①ON/OFF:
 Power on/off switch.
②POWER: This red LED illuminates when the device is connected
with power supply.
③IR IN: Remote control signal receive.
④OUTPUT A: Press this button to select the input source to HDMI
OUTPUT A, and these red LED illuminate when the
output select to the corresponding input.
⑤OUTPUT B: Press this button to select the input source to HDMI
OUTPUT B, and these red LED illuminate when the
output select to the corresponding input.
⑥OUTPUT C: Press this button to select the input source to HDMI
OUTPUT C, and these red LED illuminate when the
output select to the corresponding input.
⑦OUTPUT D: Press this button to select the input source to HDMI
OUTPUT D, and these red LED illuminate when the
output select to the corresponding input.
Rear Panel
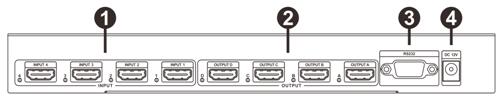 ①INPUT PORTS:
 LED1-4 illuminate when the HDMI signal plug in INPUT
1-4 port. INPUT 1-4 ports are where you connect the
HDMI source.
②OUTPUT PORTS: LED A-D illuminate when the TV plug in OUTPUT A-D
ports. OUTPUT A-D ports are where you connect the
HDTV or monitor with HDMI cable
③RS232: This port can control the matrix via PC.
④DC 12V: Plug the 12V DC power supply into the unit and connect the
adaptor to AC wall outlet.
①INPUT PORTS: LED1-4 illuminate when the HDMI signal plug in INPUT
1-4 port. INPUT 1-4 ports are where you connect the
HDMI source.
②OUTPUT PORTS: LED A-D illuminate when the TV plug in OUTPUT A-D
ports. OUTPUT A-D ports are where you connect the
HDTV or monitor with HDMI cable
③RS232: This port can control the matrix via PC.
④DC 12V: Plug the 12V DC power supply into the unit and connect the
adaptor to AC wall outlet.
Right Panel
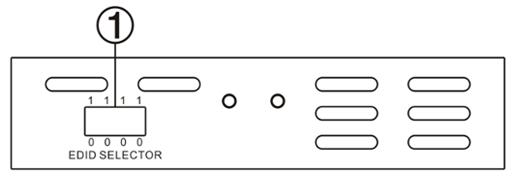 ①
①EDID Selector: Select HDMI output signal format via EDID Selector.
|
Number |
EDID Selector |
Description |
|
1 |
0000 |
Auto mode(default) |
|
2 |
0001 |
1080I,Stereo Audio 2.0 |
|
3 |
0010 |
1080I,Dolby/DTS 5.1 |
|
4 |
0011 |
1080I,HD Audio 7.1 |
|
5 |
0100 |
1080P,Stereo Audio 2.0 |
|
6 |
0101 |
1080P,Dolby/DTS 5.1 |
|
7 |
0110 |
1080P,HD Audio 7.1 |
|
8 |
0111 |
3D,Stereo Audio 2.0 |
|
9 |
1000 |
3D,Dolby/DTS 5.1 |
|
10 |
1001 |
3D,HD Audio 7.1 |
|
11 |
1010 |
4K2K,Stereo Audio 2.0 |
|
12 |
1011 |
4K2K,Dolby/DTS 5.1 |
|
13 |
1100 |
4K2K,HD Audio 7.1 |
|
14 |
1101 |
1024x768 DVI |
|
15 |
1110 |
1920x1080 DVI |
|
16 |
1111 |
PC Software control mode |
Remote control
 OUT A:
 Press 1\2\3\4 button will to select input source to
HDMI OUT A, and the LED will indicate the corresponding
input source.
OUT B: Press 1\2\3\4 button to select input source to
HDMI OUT B, and the LED will indicate the corresponding
input source.
OUT C: Press 1\2\3\4 button to select input source to HDMI
OUT C, and the LED will indicate the corresponding input source.
OUT D: Press 1\2\3\4 button to select input source to HDMI
OUT D, and the LED will indicate the corresponding input source.